Fun Friday
Friday's are always busy for us, well actually they are busy for our kids who are involved in sports, and we are busy cheering them on . Football for us just came to an end, however our school didn't miss a beat. We immediately started with basketball. Our middle son, Eli, is a Senior in High School this year, and starts on the Varsity team. We won our first game, but not before Eli had to come out of the game complaining that his thumb hurt really bad. Eli fell and a child on the other team stepped on his hand, and ultimately broke his thumb. He's really in great spirits though and ready to discuss options with his doctor that will keep him playing. He's a very determined kid so I am sure he will get his way and be playing in the very next game.
This brings me to Fun Friday. Having five kids can get pretty expensive going anywhere, especially sports events where everyone wants a drink, nacho's and a candy. It adds up pretty quickly. When we have time, we like to eat diner before we go and take snacks with us that will keeps them away from the concession stand. This doesn't make it any easier though, you will still have to say 'no' fifty million times, but you can distract them by pulling out pre-made snacks that will keep them busy and hopefully save you a few bucks.
One of our favorite we call Monster Mash, because its a mixture of sorts similar to trail mix. We started it at Halloween, which is why we call it Monster Mash, and to make it fun we decided to rename all of the ingredients to be Halloween-ish to make it more fun.
You can add almost any dry snack to this and make it your own, just come up with fun or gross (if you have boys) things to call each item.
For our mix we like to use the following:
Popcorn (just microwave popped popcorn) (spider eggs)
Marshmallow's (ghost poop)
Pretzels (witch's broomsticks)
Peanut Butter M&M's (zombie poop)
Plain M&M's (bat eyes)
All you have to do is pop the popcorn in the microwave, then mix all the ingredients together in a large bowl and divvy it out into baggies. Pack a cooler with drinks and ice and you have your snacks! Most of the games we go to allow you to bring your own snacks- as in- they don't check your bags. We don't take a cooler into our games, just our drinks, and the only time we haven't been able to is when a school has a new gym and they don't allow food and drinks. However, they always allow you a certain area for snacks- so at halftime when the kids a whiny and want something from the concession stand, just show them how long the line is, run to the car and come back with snacks!
Saturday, November 16, 2019
Friday, November 15, 2019
Thrifty Thursday
We have 5 Children between the two of us. Yes, that was not a typo-5.....Five.....Cinco..... a whole basketball team. Having this many children means that you have this many birthday parties every year, and this many to buy for for Christmas, and pretty much everything times 5. How do we make it work? Sometimes, its a miracle and we wouldn't be able to explain how it happens, but it always does.
Honestly though, Thrift Store Shopping. At some point in our lives Thrift Store Shopping just became the norm. We hung up our hopes and dreams of owning the next best things hot off the shelves, and realized that things are only new until you purchase them. Once you hand over your money and take that item out of the store- its no longer new. So....why wouldn't we shop thrift stores first?
Since staying home with my little guy, we have been doing 'school work' at home. We didn't have a good place to do it though. Sure, we had the dining table- but that's usually always covered in crafting supplies and projects setting out to dry. So, I went on a search for a small desk. I found this sweet little desk for my little guy. It was wobbly, it had scratches all over it, and the chalkboard top had some writing on it that was permanent. It was only $9! For both the char and the desk! It was PERFECT! Mainly because it was in my price range, but mostly for what I saw it could be.
Your probably thinking I lost my mind, like my husband often does, but hear me out. With a little elbow grease and some TLC I just knew this piece was going to be amazing. Now- me- being the over zealous type and super ready to get started, I didn't get a good before pic. I did however get this cute pic of our kitty, Lily, posing gracefully on the chair that went with the desk that might give you an idea of what it looked like before.
The first thing I did was take some sand paper to the whole thing. It seemed to have a clear coat finish on it, and I needed to rough it up so that my new paint would stick to it. Now, as I mentioned before, we have lost many things in the moving process. One of those things was my hand sander. It really is missed greatly by myself, especially in times like these. When I said to use elbow grease- that's exactly what I had to do. But, anything for a smile on our kids face right?
Once I got it all sanded down, I taped off the chalk board top and then took it outside and started painting. My little guy is really into everything Spider-man right now, so I opted for a true Blue and Red color of spray paint. I wanted it to have a type of Ombre look to it, but didn't want the colors to mix, because well, Blue and Red make Purple, and there is no Purple to Spider-man. I started with the piece upside down, and painted the blue on first and allowed it to dry all the way, then I flipped it over and painted the top and worked my way down to meet the blue. I didn't want a straight edge on it, that way it would look like the colors just kind of fade into each other.

Once the Red was completely dry, I peeled back the tape to uncover the chalk board, and then taped off around that. I used a spray chalk board paint, and had to use a few layers to cover up what was already on it. Once the chalkboard paint was dry, I brought it inside to complete the finishing touches. I used white puff paint from the craft department at Wal-Mart, and created some spider webs to complete the Spider-Man look.

This is the finished product! My little boy just loves it. He could hardly wait to use it to start his school work. Sometimes he even likes to sit and eat his breakfast at his little desk. Of course, there are some imperfections to it, but your children will never see that, they will only see how much you care to make them something they will love.
We have 5 Children between the two of us. Yes, that was not a typo-5.....Five.....Cinco..... a whole basketball team. Having this many children means that you have this many birthday parties every year, and this many to buy for for Christmas, and pretty much everything times 5. How do we make it work? Sometimes, its a miracle and we wouldn't be able to explain how it happens, but it always does.
Honestly though, Thrift Store Shopping. At some point in our lives Thrift Store Shopping just became the norm. We hung up our hopes and dreams of owning the next best things hot off the shelves, and realized that things are only new until you purchase them. Once you hand over your money and take that item out of the store- its no longer new. So....why wouldn't we shop thrift stores first?
Since staying home with my little guy, we have been doing 'school work' at home. We didn't have a good place to do it though. Sure, we had the dining table- but that's usually always covered in crafting supplies and projects setting out to dry. So, I went on a search for a small desk. I found this sweet little desk for my little guy. It was wobbly, it had scratches all over it, and the chalkboard top had some writing on it that was permanent. It was only $9! For both the char and the desk! It was PERFECT! Mainly because it was in my price range, but mostly for what I saw it could be.
Your probably thinking I lost my mind, like my husband often does, but hear me out. With a little elbow grease and some TLC I just knew this piece was going to be amazing. Now- me- being the over zealous type and super ready to get started, I didn't get a good before pic. I did however get this cute pic of our kitty, Lily, posing gracefully on the chair that went with the desk that might give you an idea of what it looked like before.
The first thing I did was take some sand paper to the whole thing. It seemed to have a clear coat finish on it, and I needed to rough it up so that my new paint would stick to it. Now, as I mentioned before, we have lost many things in the moving process. One of those things was my hand sander. It really is missed greatly by myself, especially in times like these. When I said to use elbow grease- that's exactly what I had to do. But, anything for a smile on our kids face right?
Once I got it all sanded down, I taped off the chalk board top and then took it outside and started painting. My little guy is really into everything Spider-man right now, so I opted for a true Blue and Red color of spray paint. I wanted it to have a type of Ombre look to it, but didn't want the colors to mix, because well, Blue and Red make Purple, and there is no Purple to Spider-man. I started with the piece upside down, and painted the blue on first and allowed it to dry all the way, then I flipped it over and painted the top and worked my way down to meet the blue. I didn't want a straight edge on it, that way it would look like the colors just kind of fade into each other.
Once the Red was completely dry, I peeled back the tape to uncover the chalk board, and then taped off around that. I used a spray chalk board paint, and had to use a few layers to cover up what was already on it. Once the chalkboard paint was dry, I brought it inside to complete the finishing touches. I used white puff paint from the craft department at Wal-Mart, and created some spider webs to complete the Spider-Man look.
This is the finished product! My little boy just loves it. He could hardly wait to use it to start his school work. Sometimes he even likes to sit and eat his breakfast at his little desk. Of course, there are some imperfections to it, but your children will never see that, they will only see how much you care to make them something they will love.
Cheap and Easy Christmas Ornaments
We have moved a few times in the last few years just before we finally purchased our home. Moving stinks. Its painfully labor intensive and you almost always lose your things that you really didn't want to part with. I, unfortunately, lost most of my cherished Christmas ornaments. Honestly, it hurt my heart that I lost them, but who has time to dwell on 'things' that are replaceable. Yes- some were irreplaceable, such as the cute ornaments my children had made through out the years, but, like I said- they are only 'things'.
Being really really broke and moving in the middle of Thanksgiving we had to come up with something super cheap, but also something fun that the children would love. While pacing the isles in Wal-Mart, looking for ornaments to cover the whole tree, that weren't breakable and were kid friendly, I thought we should try the toy isle. That's when I spotted a giant tub of dinosaurs for just under $10.
I grabbed the giant tub of dinosaurs, and my husband had thought I had officially lost 'it'. I then ventured into the hardware department and picked out two colors of spray paint that would please both the girls and boys in our home, then I found a can of glitter spray paint. What says Christmas ornament more than glitter? Probably that cheap silver tinsel, but I had to do a little better than that for our kiddos.
I purchased eye hooks, and my husband and I screwed on into each dinosaur by hand. Then we took our little Dino's outside and separated them out and painted half one color and the other half with the second color. Once they dried, we flipped them and painted the opposite sides. Once that dried we stood them all up and did a quick spray of glitter on all of them. Now, what we didn't think of- was that we had laid these Dino's down on a board on the tailgate of my husband's truck, and did not put anything under that. To this day, he still had turquoise and hot pink spray paint on the tailgate of his truck. So- you may want to splurge for that cheap plastic drop cloth, unless you are ready for paint on whatever surface you are using.
Our little Dino's are on their 3rd year now and still going strong. We also added a bigger T-Rex as our tree topper. We found him at a Family Dollar Store, and painted him the same way as the others.
This year I think we will add pretty little bows, and maybe a few more Dino's in another color. As much as I love a traditional white light tree with beautiful fancy ornaments, our children are only little for a short time. Why not enjoy that time with fun little things like a Dino tree.
We have moved a few times in the last few years just before we finally purchased our home. Moving stinks. Its painfully labor intensive and you almost always lose your things that you really didn't want to part with. I, unfortunately, lost most of my cherished Christmas ornaments. Honestly, it hurt my heart that I lost them, but who has time to dwell on 'things' that are replaceable. Yes- some were irreplaceable, such as the cute ornaments my children had made through out the years, but, like I said- they are only 'things'.
Being really really broke and moving in the middle of Thanksgiving we had to come up with something super cheap, but also something fun that the children would love. While pacing the isles in Wal-Mart, looking for ornaments to cover the whole tree, that weren't breakable and were kid friendly, I thought we should try the toy isle. That's when I spotted a giant tub of dinosaurs for just under $10.
I grabbed the giant tub of dinosaurs, and my husband had thought I had officially lost 'it'. I then ventured into the hardware department and picked out two colors of spray paint that would please both the girls and boys in our home, then I found a can of glitter spray paint. What says Christmas ornament more than glitter? Probably that cheap silver tinsel, but I had to do a little better than that for our kiddos.
I purchased eye hooks, and my husband and I screwed on into each dinosaur by hand. Then we took our little Dino's outside and separated them out and painted half one color and the other half with the second color. Once they dried, we flipped them and painted the opposite sides. Once that dried we stood them all up and did a quick spray of glitter on all of them. Now, what we didn't think of- was that we had laid these Dino's down on a board on the tailgate of my husband's truck, and did not put anything under that. To this day, he still had turquoise and hot pink spray paint on the tailgate of his truck. So- you may want to splurge for that cheap plastic drop cloth, unless you are ready for paint on whatever surface you are using.
Our little Dino's are on their 3rd year now and still going strong. We also added a bigger T-Rex as our tree topper. We found him at a Family Dollar Store, and painted him the same way as the others.
This year I think we will add pretty little bows, and maybe a few more Dino's in another color. As much as I love a traditional white light tree with beautiful fancy ornaments, our children are only little for a short time. Why not enjoy that time with fun little things like a Dino tree.
Boredom Busters
Some days are just lazy. You don't want to leave the house or get out of your pajama's, or in my littlest' case he doesn't want to put clothes on at all. But, as much as all of us mom's would love a lazy day, even the laziest of days we are still expected to help our children figure out what to do. Right when you start getting your lazy on, you will inevitably hear those cringe worthy words from your children....."MOM! I'm Bored!!!".
Ugh. You just want to pull your hair out and hide in the bathroom, but- you have to pull up your mama pants and figure it out. I have several super easy, super cheap Boredom Busters that I like to rotate. This is one of my absolute favorites though. What kid doesn't love to draw? Well- with 5 children- there are kids out there that do not enjoy drawing. So- if you have one of those, like I do, sometimes you have to make it fun for them and help them along.
For instance, my little- he's not really interested in coloring or drawing or really any crafty thing unless its super easy, super fast, and super messy.
My first Boredom Buster is simple. A roll of Butcher paper. No, we are not becoming butchers- we are going to let our imagination run wild with crayons, paint, and markers. Butcher paper is fun because its a little thicker than regular paper, its on a huge roll that you can just roll out, and it rolls right back up super easy.
Honestly, this is the cheapest and easiest fun that can last for hours. To make it fun for the ones that don't like drawing- we make it a story or a challenge. So- you can read a story and ask them to draw a picture of the main character or something they found interesting in the book, or you can have them make up their own story and draw it. You can challenge them without them even knowing its a challenge, "I bet you can't draw a bird", sometimes this reverse psychology works, sometimes its already been overused and they can see straight through you. As you can see in the picture below, they were all giggles and really enjoyed making their own creations.
A roll of butcher paper can set you back anywhere from about $13-$30, but is totally worth it and will last a very long time (if you don't use it everyday). For crayons, markers and paints, I always hit up the back to school sales and get them for about a quarter each and keep them stashed away for lazy days. As you can see in the pictures, it is very important to draw lines to separate each child's space and make sure you put their names on their spaces as well. This helps keep the peace with multiple children. Below you will see the finished masterpieces. Hopefully this will help you to keep your children's imaginations rolling while you still get to enjoy a lazy day.


Some days are just lazy. You don't want to leave the house or get out of your pajama's, or in my littlest' case he doesn't want to put clothes on at all. But, as much as all of us mom's would love a lazy day, even the laziest of days we are still expected to help our children figure out what to do. Right when you start getting your lazy on, you will inevitably hear those cringe worthy words from your children....."MOM! I'm Bored!!!".
Ugh. You just want to pull your hair out and hide in the bathroom, but- you have to pull up your mama pants and figure it out. I have several super easy, super cheap Boredom Busters that I like to rotate. This is one of my absolute favorites though. What kid doesn't love to draw? Well- with 5 children- there are kids out there that do not enjoy drawing. So- if you have one of those, like I do, sometimes you have to make it fun for them and help them along.
For instance, my little- he's not really interested in coloring or drawing or really any crafty thing unless its super easy, super fast, and super messy.
My first Boredom Buster is simple. A roll of Butcher paper. No, we are not becoming butchers- we are going to let our imagination run wild with crayons, paint, and markers. Butcher paper is fun because its a little thicker than regular paper, its on a huge roll that you can just roll out, and it rolls right back up super easy.
Honestly, this is the cheapest and easiest fun that can last for hours. To make it fun for the ones that don't like drawing- we make it a story or a challenge. So- you can read a story and ask them to draw a picture of the main character or something they found interesting in the book, or you can have them make up their own story and draw it. You can challenge them without them even knowing its a challenge, "I bet you can't draw a bird", sometimes this reverse psychology works, sometimes its already been overused and they can see straight through you. As you can see in the picture below, they were all giggles and really enjoyed making their own creations.
A roll of butcher paper can set you back anywhere from about $13-$30, but is totally worth it and will last a very long time (if you don't use it everyday). For crayons, markers and paints, I always hit up the back to school sales and get them for about a quarter each and keep them stashed away for lazy days. As you can see in the pictures, it is very important to draw lines to separate each child's space and make sure you put their names on their spaces as well. This helps keep the peace with multiple children. Below you will see the finished masterpieces. Hopefully this will help you to keep your children's imaginations rolling while you still get to enjoy a lazy day.
Thanksgiving
This is the time of year where we look back and are Thankful for all that we have. This is the time of year where family and friends gather and over indulge on all things yummy. Having such a diverse family we do not really discuss the 'story' of how Thanksgiving came to be, or how misconstrued the 'story' has become. What we do is look at it as a day to be Thankful that we are all together. We cook the traditional Turkey and Ham with all the fixings, because, well, they are so yummy, and we simply spend time together.
This is also the time of year where the schools start sending home cute little projects to work on at home. These projects can be overwhelming to some, and it was definitely was to me at first. We have seen many cute variations of this little tradition, and there are so many easy ways to make it.
This is the 'Disguise the Turkey' project your elementary kids bring home. The teacher will send a page with a turkey printed on it, with instructions to 'Disguise' your turkey so he doesn't become Thanksgiving Dinner. The first time this was sent home, I had not idea what they expected. Do I buy it a costume? Do I Color it, do I cut it out and make it look like something totally different?
What is so great about this, is that there are not definite instructions. This is an imagination exercise that parents and students to together. It really is fun to sit at the dining table, with a box full of craft supplies and think of all the different ways you can make your turkey look like something else. We have seen people turn theirs into a bucket of popcorn, superheros, and even Christmas trees with all the decorations. We have seen simple ones that are just colored over the turkey on the page and we have seen extreme ones where the turkey has been cut out and decked out with a real wreath and real lights.
We are an in between family- right between the minimum needed and too extreme- or at least we like to think that. This is our first Turkey, and was made the night before it was due- even though we had him for a week. After pulling out the craft box, the pickings were kinda slim. We were broke and this was going to be a use what you have kind of craft. We had recently watched that cute Madagascar movie where the zebra dresses up like a clown, and we just happened to have contact paper with a zebra print.
We were able to scrounge up some little pom poms and used those as his clown wig, then we had feathers left over from another project- and what turkey doesn't have feathers? We imagined if our turkey was trying to stuff himself inside of a zebra costume, he'd have trouble hiding his feathers, so of course they were going to stick out. We needed a way for our Turkey to stand up so he could be displayed, so when we cut him out, we glued him to the cardboard round from a paper towel roll. Of course we cut it to size. This is our finished project, shown to you by my daughter "O", and if I must say so myself, I think he turned out to be the cutest little turkey of all time.
I hope when you have this project sent home, that you are able to think outside of the box, or in our case of 'use what you have', and think inside of the craft box.
This is the time of year where we look back and are Thankful for all that we have. This is the time of year where family and friends gather and over indulge on all things yummy. Having such a diverse family we do not really discuss the 'story' of how Thanksgiving came to be, or how misconstrued the 'story' has become. What we do is look at it as a day to be Thankful that we are all together. We cook the traditional Turkey and Ham with all the fixings, because, well, they are so yummy, and we simply spend time together.
This is also the time of year where the schools start sending home cute little projects to work on at home. These projects can be overwhelming to some, and it was definitely was to me at first. We have seen many cute variations of this little tradition, and there are so many easy ways to make it.
This is the 'Disguise the Turkey' project your elementary kids bring home. The teacher will send a page with a turkey printed on it, with instructions to 'Disguise' your turkey so he doesn't become Thanksgiving Dinner. The first time this was sent home, I had not idea what they expected. Do I buy it a costume? Do I Color it, do I cut it out and make it look like something totally different?
What is so great about this, is that there are not definite instructions. This is an imagination exercise that parents and students to together. It really is fun to sit at the dining table, with a box full of craft supplies and think of all the different ways you can make your turkey look like something else. We have seen people turn theirs into a bucket of popcorn, superheros, and even Christmas trees with all the decorations. We have seen simple ones that are just colored over the turkey on the page and we have seen extreme ones where the turkey has been cut out and decked out with a real wreath and real lights.
We are an in between family- right between the minimum needed and too extreme- or at least we like to think that. This is our first Turkey, and was made the night before it was due- even though we had him for a week. After pulling out the craft box, the pickings were kinda slim. We were broke and this was going to be a use what you have kind of craft. We had recently watched that cute Madagascar movie where the zebra dresses up like a clown, and we just happened to have contact paper with a zebra print.
We were able to scrounge up some little pom poms and used those as his clown wig, then we had feathers left over from another project- and what turkey doesn't have feathers? We imagined if our turkey was trying to stuff himself inside of a zebra costume, he'd have trouble hiding his feathers, so of course they were going to stick out. We needed a way for our Turkey to stand up so he could be displayed, so when we cut him out, we glued him to the cardboard round from a paper towel roll. Of course we cut it to size. This is our finished project, shown to you by my daughter "O", and if I must say so myself, I think he turned out to be the cutest little turkey of all time.
I hope when you have this project sent home, that you are able to think outside of the box, or in our case of 'use what you have', and think inside of the craft box.
Thursday, November 14, 2019
Welcome to Baby's Got Bubble Gum - Blog Re-Invented!
This blog will take you on an adventure with our family. I will show you a peak into my world. I recently decided that I had had enough of working for the man, and decided I was going to do what it took to actually live my life with my children and husband. After working in a Chemo clinic, I had seen way too much. It really played a role in my emotions when I decided enough was enough and I had to be home and spend time with my kids before they are not kids anymore.
I quit my job in March, with many hopes and dreams of what type of stay at home mom I would be. I have dabbled in many things since then, and I am excited to show you all of my successes and failures. I can honestly say there have probably been way more failures- but you can never really get to where you are going unless you fail. Some have been hard falls, some have been bouncy falls, and some have been minor trips. Most of all, I want to share with you what I have learned and how I have kept my head held high, even with so many naysayers. (and sometimes it feels like everyone is).
I hope you enjoy what I share!
This blog will take you on an adventure with our family. I will show you a peak into my world. I recently decided that I had had enough of working for the man, and decided I was going to do what it took to actually live my life with my children and husband. After working in a Chemo clinic, I had seen way too much. It really played a role in my emotions when I decided enough was enough and I had to be home and spend time with my kids before they are not kids anymore.
I quit my job in March, with many hopes and dreams of what type of stay at home mom I would be. I have dabbled in many things since then, and I am excited to show you all of my successes and failures. I can honestly say there have probably been way more failures- but you can never really get to where you are going unless you fail. Some have been hard falls, some have been bouncy falls, and some have been minor trips. Most of all, I want to share with you what I have learned and how I have kept my head held high, even with so many naysayers. (and sometimes it feels like everyone is).
I hope you enjoy what I share!
Salt Dough
Since becoming a stay at home mom, we have learned many ways to create cheap entertainment.
This experiment was really a lot of fun. Although I am not really a fan of Salt Dough, simply because of the texture, (its a gritty, dry your hands out really bad texture) it was still so much fun. My little boy was 3 at the time of doing this, so this really is something little kids can get excited about doing. I would suggest using some rubber gloves to prevent the food coloring from getting on your hands, an apron to cover their clothing, and a huge sprinkle of patience- because they will want to do it all by themselves at first.
When we were all done, we simply stored our dough in zip lock bags, and used them again and again for about a week before I tossed it. You could, however, set the dough in the oven at a very low temp to create a really fun keepsake, Christmas ornament or even cute coasters for your sweet tea!
First, to make things easier for little hands, if you pre-measure everything and have it all together and ready to pour, it will make things so much easier and less stressful.
Next, I had my son pour all the flour and salt into the big empty bowl and mix. Then I slowly started pouring in the water and had to take over the mixing when it started getting stiff and difficult for little hands.
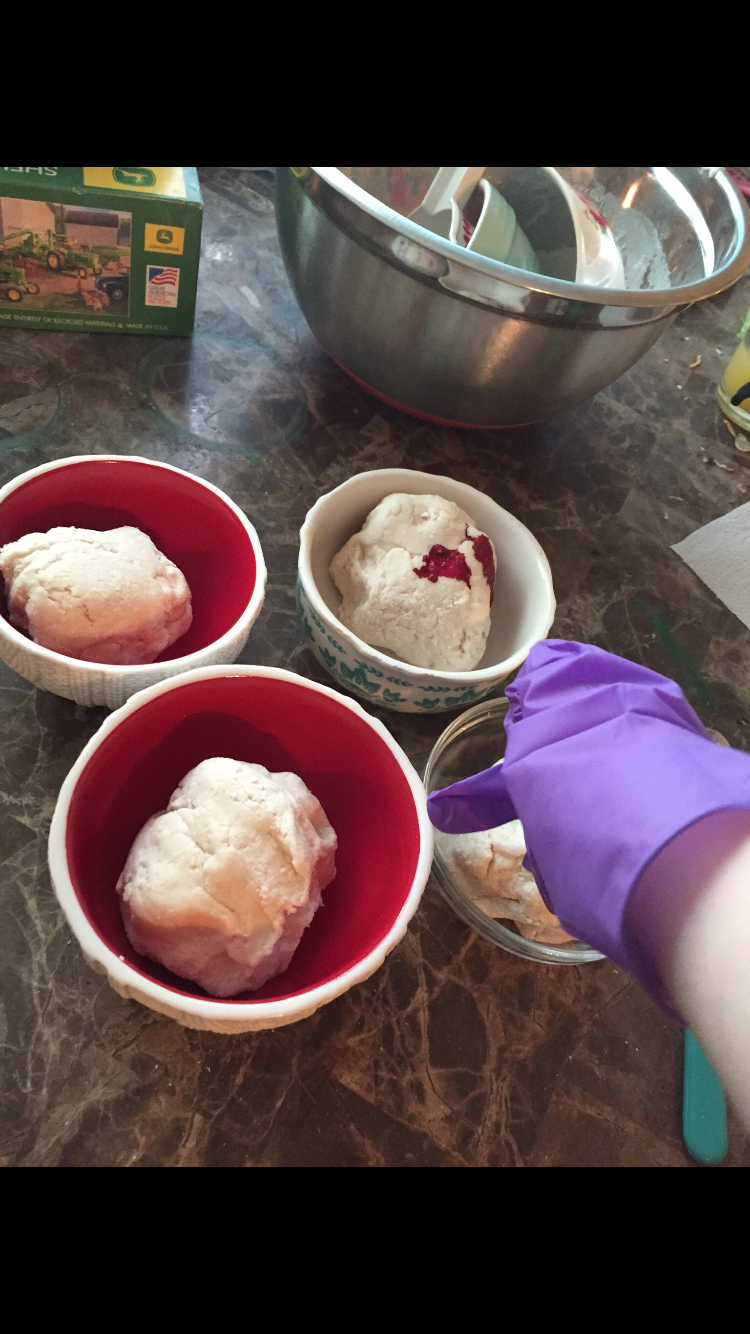
Once we had everything all mixed together and at the right consistency, we divided the dough up into 4 balls and placed in smaller bowls. Then we added a few drops of food coloring to each bowl. We put them in separate bowls to keep the colors separate, and only added one color per bowl. Notice the nifty rubber gloves? Those things really do come in handy in times like this.
Once we added the food coloring, we mixed the food coloring in very well by kneading each ball separately. You can lay down some wax paper, or set on a baking sheet as well to help control the mess. We usually don't, and it really shows on my table. I usually have paint stains on my table more often than food due to all of our crafting. My sweet husband thought we were buying a diner table, that was so cute, little did he know that table would forever be covered with crafting supplies!
This is our finished product. The color didn't really mix as well as I expected, but we were pleasantly pleased with the pastel colors we made.
Once we were done making our play dough we had to try it out. We had fun using our Christmas cookie cutters. This is a very dry dough, and seems to crack easily. There are other recipe's out there that include oil or cream of tartar (neither of those were in my pantry at the time), and I'm sure they would work much better. We will have to try those other's and let you know the difference. But, as you can see, this was a lot of fun.
This is the recipe we followed:
2 Cups of Flour
1 Cup of Salt
1 Cup of Water
Food Coloring
Instructions:
We mixed together the flour and salt and gradually started adding in water until it became a play dough like consistency. If you get too much water and its really sticky, just add a little bit of flour and mix until it becomes a play dough like consistency.
After we had it all mixed up, we separated into small balls and then added a few drops of food coloring to each ball. Then we rolled it and kneaded it until all the food coloring was mixed in. The colors never really got too bright, and the more you add the more sticky the dough becomes. We decided the light colors were just fine and worked for us.
You can use cookie cutters, lids, cups, butter knifes, and all kinds of things to make patterns, shapes and texture to the dough.
Subscribe to:
Posts (Atom)
Late night conversations with Ben
Scene- Driving in the car with Brad on the phone I don't quite remember how we got on the subject of Woodchucks, but we did. Me: Are wo...
-
Scene- Driving in the car with Brad on the phone I don't quite remember how we got on the subject of Woodchucks, but we did. Me: Are wo...
-
Freebies on My Birthday Tuesday was my birthday. Having birthday's when your on a budget feel like just another day. They are really h...
-
What I learned going to the movies with my youngest 1. Choose a seat on the outside of the row Why? Because there will be many trips t...